Showing posts with label Busy Bag. Show all posts

Thursday, May 17, 2012

MINI FELT BOARD

Every parent should make their child a Felt Board. Not only is it a fun way to teach a child about colors and shapes but it is definitely a great time passing activity.  I made two of these for Colton, one large one that i keep at home and this Mini one that i keep in the car for road trips or dining out at a restaurant.  Felt boards teach kid's about creativity.

Here's what you need:
*SHEETS OF FELT (multiple colors and 1 LARGE piece of felt in either white or black for the board)
*CARDBOARD (a sturdy piece for the actual felt board)
*GLUE GUN

To make the felt board you wrap the large piece of felt around the piece of cardboard and glue it with the glue gun.  I suggest using either black or white for the board since most colors will stand out against them.

To make the pieces, i just cut out multiple shapes and sizes of the felt. I bought lots of different colors of felt to make more variety.  The great thing about a felt board is that the felt pieces stick without needing anything.  Like i said before this is a GREAT activity for the car and restaurant.  My son absolutely LOVES this! I think i'm going to add more pieces for him to play with.
(Here's a picture of the mini one that we use in the car) 

ICE CREAM COLORS ACTIVITY

At 20 months, I am working on teaching colors to my son right now.  I love having multiple activities that are focused on colors.  I thought this activity was super cute. I saw a variation on a website and decided to make my own version for my son.

This activity uses ice cream and ice cream cones for color matching.  It's a really cute idea and one of my favorite color activities.


All i did was draw out ice cream scoops on different colors of card stock. Then i drew triangles (for the cones) on brown card stock.  On the ice cream scoops, i wrote out the  names of each color. Then i cut out a matching circle of card stock and glued one to each ice cream cone in order to make it a matching activity. I laminated all the pieces and now have a cute way of teaching colors to my son.  This activity could also be a great busy bag idea for the car or airplane. I will definitely be taking this one on vacation for a car activity. 

SHAPE SORTING ACTIVITY 1

Here's what you need:
*SHAPE SORTING GRID (i made mine using Excel. I laminated it for durability)
*FOAM SHAPES or FOAM SHEETS (i bought a package of foam sheets in multiple colors. Then i cut out the shapes that i needed.)

All i did for this activity was create a Shape Sorting grid on the computer, printed it and laminated it.  Then i took the foam sheets and cut out the corresponding shapes in multiple colors. I recommend using basic shapes that are very different from each other. I made 3 of each shape but you could do more. 

My son is still a little young for this activity but it is another one that i will be glad that i have once he's a little bit older.


CHARACTER PUZZLE

This is probably one of my favorite activities that i have made so far.  It teaches your lil one matching using some of their favorite characters!


Here's what you need:
*PRINT OUTS OF YOUR CHILD'S FAVORITE CHARACTERS (i googled images of my son's faves and then printed them big enough to fill about half of a 8x10 piece of paper)
*LAMINATOR (again this is optional but it really does make it more durable)


All i did was print out several pictures of Colt's favorite characters. I used ones with distinct bodies or outfits.  Once they were printed, i cut each one out, carefully separating their head from their body. Once they are all cut out i laminate all the pieces and cut them out.  Then you have a really cute matching game. You can even call out a character's name and have your child find the parts to build them.  


My son is 20 months old and he actually was able to build a couple of them.  Right now he mostly just finds their faces and but we are working on matching their bodies to the faces.


SENSORY BALLOON ACTIVITY

My son is at that stage where he has to touch, squeeze, and shake everything. So he absolutely LOVES these balloons.  Let you child explore with this activity to learn different textures.


Here's what you need:
*BALLOONS (You want to get the kind that are good quality, and thick. Do not use ones that are too thin like water balloons. They need to be of good quality to ensure that they won't break.)
*SALT, FLOUR, RICE, OATMEAL, AND POPCORN KERNELS


Fill each balloon about 2/3 full with a different item and tie. Then let your little one explore! This is probably the easiest activity i've ever made!! And besides the balloons, everything  you need is probably already in your pantry.  


Monday, April 30, 2012

DYED PASTA ACTIVITIES

I'm always looking for neat new activities for my son that are both educational and FUN.  I came across a version of this activity one day while searching the web and so I decided to try it! It's super easy to put together and my son loves it!


Teach toddlers about colors with dry pasta that's dyed with food coloring!


Here's what you need:
*Food coloring (multiple colors, i used regular colors and the neon ones)
*Rubbing Alcohol
*Ziploc Bags (gallon size)
*Pasta (preferably rigatoni or another type with a large hole for stringing)
*Paper Towels and Newspaper (for drying)


First before you start I should mention one thing. While preparing this activity there might be a strong odor from the rubbing alcohol. So make sure to do this in a well ventilated area.  Don't worry about the pasta smelling like the alcohol. Once the pasta is completely dry it will be odorless.  


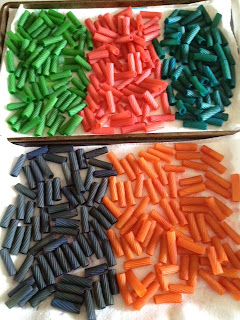
To start, line a cookie sheet with some newspapers and paper towels on top.  Add about 1/2 cup of rubbing alcohol to a Ziploc bag, then add one color of food coloring. I used quite a bit of food coloring for each bag in order to get a deep color.  Swish the food coloring and alcohol around in the bag to make sure it is combined.  Next add some dried pasta to the bag.  Zip closed and place on the baking sheet.  Continue with the remaining colors.  Place all the bags on the cookie sheets and let sit.  Don't expect an instant result. This process takes several hours to achieve a deep color, making sure you flip the bags around every hour or so.  


Once the pasta has achieved the desired color it is time to let the pasta dry.  Over the sink (with hot water running), cut the bottom corner off the bag, making sure the cut only makes a small hole so the pasta doesn't fall out.  Drain all of the liquid out of the bag then pour the pasta onto the paper towel lined cookie sheets to dry. 


Let the pasta dry completely before handling.  This process usually takes another few hours.  And once it's dry you have lots of brightly colored pasta for multiple fun activities!! 


Teach pattern making by having your toddler string the pasta onto a long shoelace with a knot tied in one end.


Teach about color sorting with the pasta too! 


There are so many activities that toddlers can use this dyed pasta for. I'm even taking some to the beach with us so that my son can make designs in the sand!